As a kid, my favorite category on Jeopardy was always Potpourri. It was the stick-all-the-random-questions-here category, the junk drawer of Jeopardy, and it was inevitably the hardest category because the questions could range from cookies to cowboys to chemistry. It was fun. It was random. It was a general collection of useless information. And for someone who generally collects useless information, it was always my favorite.
Think of this blog post as the potpourri of the last few days. We're gonna go through some random stuff...
1) Today I have been pregnant for six months. I am not as huge as I thought I could be at this point. But my pants are getting uncomfortable and my shirts need to be longer. So not quite tiny, but not quite huge. Pretty good, size wise.
2) Baby R is a KICKER!!! If my waistband is too tight: kickkickkick. If I'm leaning forward for too long: kickkickkick. If I roll over to a different position at night: kickkickkick. If I balance ANYTHING on my tummy: KICKKICKKICK. And ESPECIALLY when I have a full bladder and am on the phone at work and there's no possible way I'm getting to the bathroom anytime soon, kickkickkickkickkickkickkickkick. If I don't see soccer scholarships in about 18 years, there will be retribution, is all I'm sayin'.
3) I realized that, because the baby is growing, I needed to increase my calcium intake and should probably be getting more fruit and vegetables in my diet. I didn't help that Kroger had strawberries on sale 2 packs for $4. Bright fresh sweet summer fruit in the middle of gloomy rainy windy February/March? Yes and please
4) Thanks to Goldberry's Seven Day Smoothie Challenge Blog Post Series, I started drinking smoothies with lunch at work. I did this instead of at breakfast for two reasons: 1) I need my morning coffee and having two drinks for breakfast would just not work and 2) it keeps me fuller longer if I have a smoothie in the middle of the day.
5) Strawberry Banana Smoothies are delicious. If pink could have a flavor, it would be strawberrybanana. Yum.
6) I now own a green tumbler from the WalMarts. Isn't it pretty?
7) I also bought a small electric heating pad for my back because six-month-old Baby R is giving me back pain and sciatica. The little dear.
8) Sciatica is NO FUN and I really am empathizing with all the people who have to suffer with it daily, rather than it being brought on and limited to the duration of a pregnancy.
9) I ordered some fabric from Fabric.com and am super pleased with how quick and easy it was to order from them. And their prices are fabu! So so so so much cheaper than Jo-Anns (even with coupons) and by combining orders for three different projects, I got free shipping. Awesomesauce
10) Those projects are:
This Maxi Skirt
Some form of this A-Line Skirt
A cover for our entry way bench modeled after the above (just no bunnies)
11) I have no idea when I'm going to find time to do these projects, but hopefully long before the baby arrives because I really want to wear those skirts and they would be soooooooooooooooooooooooooooooooooooooooooooooooooooooooo comfy as maternity skirts.
12) J and I are going to plant blueberry bushes this weekend.
13) We are also celebrating my Grandma Dot's 87th Birthday.
Isn't she the cutest grandma ever?
Happy Birthday Grandma!
And on that note, we shall end Potpourri.
"Trust in Him at all times, oh People; Pour out your heart before Him for God is a refuge for us." ~Psalm 62:8
Showing posts with label DIY. Show all posts
Thursday, March 7, 2013
Potpourri
Thursday, February 28, 2013
DIY Sandals (Made from Cheap Flip Flops)
So one of the biggest challenges facing me with this pregnancy is what
to wear to work while I'm getting more rotund and less comfortable.
While the winter months have meshed well with my nonexistent and then
slight baby bump, summer offers skirts and empire-waisted dresses to
cover the growing swell. But shoes become a problem. My current fave
shoes are dansko clogs; big, comfy, clumpy shoes that do a great job
giving me foot support and a lousy job looking cute. And they will NOT
work with summer dresses. Ballet flats, while looking great with
skirts, are not so very nice to my swelling feet and ankles and, lets be
honest here, summer = open toed shoes. I need sandals.
Mark about where you want your loops to be. We are going to "sew" the cord on either side of these marks, so if you don't mark it perfectly, that's okay, you can adjust.
Thread your cord through the needle and knot the other end. My waxed shoelace formed a really tight overhand knot, so I really didn't need to do anything fancier.
Push the needle from the bottom up back by the heal. You will need your pliers to force the needle and thread through the plastic. This takes a lot of effort.
Go about an inch down the shoe towards the toe and push the needle back through. You don't need the top loop all that tight. A little bit of give will help you later when you pass your ribbons through the loops.
Back on the bottom, position your needle about a 1/4" along from where you came down from the top and then push your needle only half way through the plastic.
Take the exacto knife and cut a shallow incision connecting where the cord comes out and where the needle goes in.
Push the needle all the way through and then use your poky instrument to jam the cord into the slit. This will protect it from wearing too fast when you walk.
Repeat steps 5 and 6 until you have four top loops, with the cord ending up on the bottom. Tie an overhand knot and cut the string. Repeat down the other side of the shoe.
For the toe anchor: push your needle through the thin rim of plastic that would stop the plug from popping out the top of the shoe. Make a smallish loop and press the needle back down to have the two tails on the other side. Overhand knot these two together and then pull the loop up the top, so that the knot is tucked into the existing hole.
Thread your bias tape in the desired manner.*
And you're done!
But sandals have three major problems: height, flip-floppeing and price.
Because the high shoes, while offering enough cushion to help my lower
back, are not good for my balancing abilities. The thinner shoes, on
the other hand, offer no cushion at all. Cushy sandals of a good height are
inevitably flip flops (a HUGE no-no for the office). And the perfect
combination of low heel, cushy, non-flip-floppy sandal are usually $60-80+. Not that I'm
faulting the designer or shoe store, they gotta make a living too, but I
am not plunking down that kinda moolah on a few strips of faux leather.
And
with the vast creative design of Pinterest at my fingertips, I went
forth on a quest to find a way to make a cheap pair of nice looking
sandals. The results: zip. At least, zip for what I'm looking for. All
the ones I found involved wrapping ribbon or leather straps around the
existing foot strap, making a pretty flip flop, but a flip flop none the
less. Further searching led me to this picture and hope!
This is
what I wanted! A convertible sandal that has the basic sole of a flip
flop but can be tied in such a way that the footwear neither flips nor
flops. But, alas, my hope was short lived. The Pin led me not to a
tutorial, but an Etsy site. And these pretty sandals are 1)
discontinued and 2) EXPENSIVE!!!!! (Granted, they are hand made
out of beautiful leather and organic cotton straps and if you want a
beautiful pair of flat sandals and are worried about your Eco-impact, please support the seller and buy here.)
So here is my attempt to recreate these beautiful shoes using el-cheapo parts of the Wal-Mart variety.
(First, please let me apologize for the crappy quality of these pictures and how dark it is. It wasn't until I was done that I realized a black cord on a black flip flop on an espresso couch in low light would not make the best tutorial pictures. If I ever repeat this process with lighter flipflops, I solemnly swear to post better looking pictures)
You will need:
- An exacto knife
- Scissors
- Yarn or tapestry needle
- Pliers
- Super glue
- Marker that will show up on the sole of your flip flop (silver in my case)
- Something thin (but not necessarily sharp) for poking
- 3 yards of double fold bias tape PER SANDAL (6 yards total)
- 70 inches of thin cord. I found a pack of waxed shoelaces, each was 27" long and I used 2.5 of them. The point is, you need a thin, strong cord that can be threaded through your needle and will stand up to walking around all day.
- You also need flip-flops.
I
found mine at Old Navy, which sells two pairs for five dollars. I intend
to make two pairs of sandals, one black and one brown, but the tutorial
only shows the black. Okay, got your stuff? Lets begin.
Cut the existing straps of the flip flop at the toe and ankle and pull the plugs off the bottom.
Mark about where you want your loops to be. We are going to "sew" the cord on either side of these marks, so if you don't mark it perfectly, that's okay, you can adjust.
Thread your cord through the needle and knot the other end. My waxed shoelace formed a really tight overhand knot, so I really didn't need to do anything fancier.
Push the needle from the bottom up back by the heal. You will need your pliers to force the needle and thread through the plastic. This takes a lot of effort.
Go about an inch down the shoe towards the toe and push the needle back through. You don't need the top loop all that tight. A little bit of give will help you later when you pass your ribbons through the loops.
Back on the bottom, position your needle about a 1/4" along from where you came down from the top and then push your needle only half way through the plastic.
Take the exacto knife and cut a shallow incision connecting where the cord comes out and where the needle goes in.
Push the needle all the way through and then use your poky instrument to jam the cord into the slit. This will protect it from wearing too fast when you walk.
Repeat steps 5 and 6 until you have four top loops, with the cord ending up on the bottom. Tie an overhand knot and cut the string. Repeat down the other side of the shoe.
For the toe anchor: push your needle through the thin rim of plastic that would stop the plug from popping out the top of the shoe. Make a smallish loop and press the needle back down to have the two tails on the other side. Overhand knot these two together and then pull the loop up the top, so that the knot is tucked into the existing hole.
Thread your bias tape in the desired manner.*
And you're done!
* I chose to fold my bias tape in half one more time and sew
it shut after making this tutorial. It looks more like ribbon, it's a
bit thinner, and I think it'll hold up longer. This is personal
preference. If you like the wide look or want to use ribbon, that is
your choice and it'll still work fine.
One
last thing: I was thinking I needed superglue to fill in the incisions
where the cord got tucked in, this is optional. If you want to, do it.
If not, no worries. Now, practice ways to lace your new sandals.
Please ignore my pasty-white, pregnancy-swollen feet. *You* will look fabulous!
Thursday, September 1, 2011
A Modest Infinity Dress
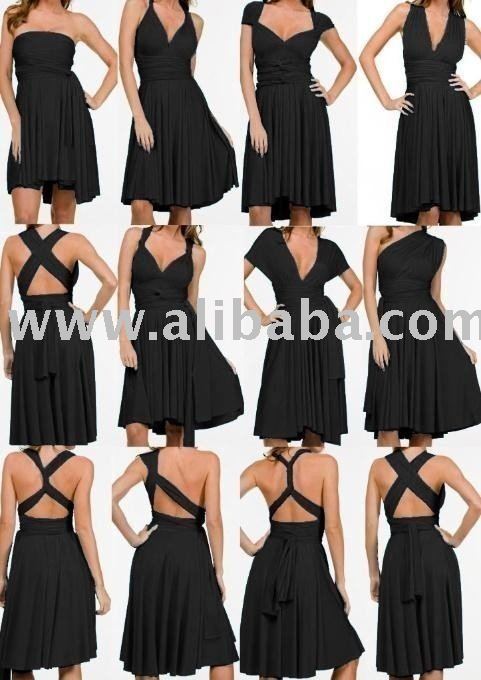
My birthday has come and gone, and with it came such generous gifts from dear friends and grandmothers that I was able to make an infinity dress. Surely, you've heard of this little gem. It is essentially a skirt with a wide waistband and two LONG straps that are used to wrap and form the bodice.
Now, to frugal me, the idea of having one basic dress that I can make into many, many different styles and looks for different occasions appealed greatly. So, I set off to make one, and rushed over to Google to find somebody to teach me. I found Sew Like My Mom who had a FABULOUS tutorial and from KnuckleSalad I found this ultra cool graphic detailing what to cut out:
Fabu.
So, got my material, got my measurements, made the dress in ONE AFTERNOON! (even with breaks to let my back rest after pinning and hemming 114" of material O.O ) I was excited, threw it on and discovered the biggest, fundamental problem with infinity dresses (which I probably could have figured out from the first picture above). See what the problem is? No. Okay, I'll spell it out, because I needed somebody to spell it out FOR me.
You cannot.
Wear a bra
With this dress.
And, as if that weren't bad enough, one of the wonderful ladies in the church kindly pointed out to me in an email just how much skin that dress reveals. Now, I was able to wrap the dress in such a way that it could completely cover my back. The problem is that 1) I pulled my tricep trying and 2) nothing short of duct tape could keep those straps there. Grrrrrrr.
But, as I lay awake last night, pondering just how to rescue my birthday present, an epiphany! A revelation! A plan!
I could extend the waist band up until it covered most of my torso (essentially creating a strapless dress). That would be the "foundation" on which I could build the different styles of dresses! w00t! So I pulled out the rest of the leftover material and doubled the length of the band to make the Modest(er) Infinity Dress.
So, if you would like to try, I recommend following the directions from either sight except for one slight adjustment. Instead of making the waistband 10" wide and doubling it, measure from your waist to the top of your bra, or to a height that is comfortable for you (for me that was 10"). Then double that number, (so to make a 10" finished waist band, I needed a width of 20"), fold and sew the raw edges to the waist of the skirt like in the directions.
Now, to frugal me, the idea of having one basic dress that I can make into many, many different styles and looks for different occasions appealed greatly. So, I set off to make one, and rushed over to Google to find somebody to teach me. I found Sew Like My Mom who had a FABULOUS tutorial and from KnuckleSalad I found this ultra cool graphic detailing what to cut out:
Fabu.
So, got my material, got my measurements, made the dress in ONE AFTERNOON! (even with breaks to let my back rest after pinning and hemming 114" of material O.O ) I was excited, threw it on and discovered the biggest, fundamental problem with infinity dresses (which I probably could have figured out from the first picture above). See what the problem is? No. Okay, I'll spell it out, because I needed somebody to spell it out FOR me.
You cannot.
Wear a bra
With this dress.
And, as if that weren't bad enough, one of the wonderful ladies in the church kindly pointed out to me in an email just how much skin that dress reveals. Now, I was able to wrap the dress in such a way that it could completely cover my back. The problem is that 1) I pulled my tricep trying and 2) nothing short of duct tape could keep those straps there. Grrrrrrr.
But, as I lay awake last night, pondering just how to rescue my birthday present, an epiphany! A revelation! A plan!
I could extend the waist band up until it covered most of my torso (essentially creating a strapless dress). That would be the "foundation" on which I could build the different styles of dresses! w00t! So I pulled out the rest of the leftover material and doubled the length of the band to make the Modest(er) Infinity Dress.
So, if you would like to try, I recommend following the directions from either sight except for one slight adjustment. Instead of making the waistband 10" wide and doubling it, measure from your waist to the top of your bra, or to a height that is comfortable for you (for me that was 10"). Then double that number, (so to make a 10" finished waist band, I needed a width of 20"), fold and sew the raw edges to the waist of the skirt like in the directions.
Here's JUST the band on me, no straps yet.
Here's JUST the band, from the back. Just about swimsuit height for me.
Here's one way to wrap it. (I know, I'm terribly happy in this picture.)
Here's one back of that same dress.
Personally, I like the X back the best, rather than the open style. I think it hides more of my tan lines. : D
So, that's how I *tried* to make this dress a little more modest than the other ones out there on the market. My one other suggestion is to lengthen the straps. They say do your height x 1.5. I say double your height. Gives you more strap to work with in securing everything.
Hope that's a helpful contribution to the world of dress making.
Subscribe to:
Posts (Atom)